
9 Simple Tips For Success
Note: At the end of this post, you can download an infographic with a summary of these tips.
In an Adobe webcast of a new-product event, an emcee is introducing the presenters to an audience of product users. As he calls each name, the individual steps forward to polite clapping. But when he calls the name “Terry White”, the audience erupts in cheers and wild applause. Some people jump to their feet. Later, during breaks in the presentation, people ask for his autograph.
So who is Terry White to inspire such devotion? Technology visionary? Hipster CEO? European design guru?
Nope. Terry White explains things. In short, efficient videos, he explains how to do things in Adobe products. He has the calm, relaxed, and affable manner of the neighborhood dad you’re pleased to run into at the hardware store. And when you’re up against a deadline, and can’t remember the finer points of Photoshop layer blends or a quicker way to handle InDesign type styles, if you find a Terry White video, you breathe a sigh of relief.
When the Adobe users went nuts over Terry White, it might have looked like they were expressing adulation. In reality, it was gratitude.
So what lessons can we learn from Terry?
1. Remember why you’re making a how-to video.

Video is good for SEO. It’s a useful sales tool. And it’s an excellent way to provide additional product support. Many organizations decide to kill three birds with one stone, and combine all their goals into one video. Don’t. Stick to one purpose, and make sure that everything in the video supports it.
2. Resist the urge to start with a sales pitch.

Consider this short video from Brother about how to set up a wireless printer. It’s only a minute and a half long, but nearly the first third is devoted to selling the printer. Why? The viewer already has the printer. He or she doesn’t want to hear from you that it’s awesome. He or she wants to experience that it’s awesome, by having it, you know, work.
Including a sales pitch makes you feel like you are Doing Marketing, but it’s a waste of the customer’s time.
But wait! What if I want to make an explainer video as a marketing tool?
You’re still making an explainer video, not a commercial. As writers have been told since before Shakespeare’s time, showing is better than telling.
Consider these two examples:
Romeo & Juliet. Does Romeo and Juliet begin with the author explaining why he wrote the play, what you’ll like about it, and ten must-see places in Verona? Nope: It sets up the problem:
Two households, both alike in dignity,
In fair Verona, where we lay our scene,
From ancient grudge break to new mutiny,
Where civil blood makes civil hands unclean.
From forth the fatal loins of these two foes
A pair of star-cross’d lovers take their life;
Whole misadventured piteous overthrows
Do with their death bury their parents’ strife.
Shakespeare describes a mess, and even gives away the ending in the very first speech of the play. But because he paints such a vivid picture, we’re desperate to find out the rest of the story.
Star Wars. Does the Star Wars franchise kick off with a PowerPoint presentation from the Lucasfilms marketing department about the branded merchandise you can buy when you get home? Of course not. After a little crawl to tell us where and when we are, there’s a modest spaceship being chased by an enormous one. And we’re hooked.
Shakespeare and George Lucas took classic approaches to an opening: setting up a problem and creating a big moment of tension. Shakespeare’s approach makes us want to know what happened. Lucas makes us want to know what happens next. Either way, the audience is not going to move until their curiosity is satisfied. Both work better than a sales pitch.
3. Choose a path for your video.

All good how-to videos answer the same question: What’s the fastest, easiest, and most straightforward way for a customer to get from Point A to Point B, feel confident and competent while doing it, and do it successfully? Answering this question seems like the easiest part of making the video: everyone involved knows how to do it, right?
But invariably, the planning meeting uncovers a surprise. Even if everyone does the task you’re demonstrating, and they were all trained the same way, over time, subtle differences have evolved in each person’s process. Some people do tasks in a slightly different order, or use different device settings. Some use shortcuts. One way might work better in the factory, another in a home, a third in an office. Customer service personnel might have deviated quite widely from the “official” procedure, if they are always helping customers find a workaround for a confusing part of the manual. One method might be easier to demonstrate in a video than another.
Discovering these differences provides an excellent opportunity to figure out your purpose for the video, talk about who your customers are, and figure out how you can help them. As a bonus, it often also provides insights into improvements you can make in many other areas, from rewriting the manual to training to product design. Once you’ve figured out which method you’re going to use, draw it out in a map or flow chart. The map or chart should have only one path. Eliminate anything that takes you and your customer on a detour.
4. Stay on course.
Don’t demonstrate ten ways to perform each step — pick the most common one or two. Don’t get off track discussing the history of your product category or why your solution is innovative. You’re on familiar territory, but your customer is not. Stay on course, or you’ll lose and confuse your customer.
5. Choose the best person for the job.

The best person to explain how to do something is the person who’s best at explaining it. The ideal candidate is comfortable on camera, speaks well and clearly, and has excellent product knowledge. He or she knows what the customer needs to know at each stage of the explanation, and can communicate it simply.
Barring perfection, choose someone with the best overall combination of skills. That might be a salesperson, installer, or a customer support specialist. Marketing people are often chosen, partly on the assumption that communication is part of their job and they’re comfortable speaking in public, partly because making the video is a marcom function. But a marketing person may not be the best option. If the person doesn’t personally do the demonstrated task on a regular basis, the results often look artificial and less than assured. If the presenter seems awkward at the task, the user is not going to have confidence that they can succeed.
No matter who you choose, the job should never be assigned as a reward or in a rotation for fairness’ sake. You’d never assign any other critical job function on that basis, so don’t start here. Save the reward situation for prime parking spots.
What if the boss wants to do it?
If your CEO is keen to do it, and they’re the right person, congratulations. If they’re not the right person, it might take some intestinal fortitude, but suck it up and have an honest conversation with him or her. After all, you’re both adults, and both after the same thing: customer satisfaction, reduced customer service costs, and repeat buyers.
(Ask us sometime about the client who wanted a video of himself talking about his product while he participated in his favorite sport, even though that sport had nothing to do with his product or market. We had that awkward conversation every six months for a couple of years. Eventually, he was very glad we talked him out of it.)
What about using actors or influencers?
Actors are trained to look natural doing things that they know nothing about, which is why actors who play doctors are sometimes asked to help in real-life emergencies. More important, good ones are comfortable talking on camera, a skill that is much harder to master than most people realize. If you rehearse actors well enough to get the mechanics of your demonstration right, they’re a good choice.
One way to maximize success when using an actor is to have them stand in for the customer, not pretend to be the expert. For example, “I’m Matt. I’m going to show you how easy it is to follow these instructions and assemble this crib,” sets the expectation and even allows for a little charming fumbling.
I’d steer clear of using influencers or spokesmodels for your how-to video. They usually look exactly like what they are, which is an attractive person who first heard about your product somewhere between getting hired and walking in from the parking lot. If they’re famous, or just more assured on camera than the expert co-presenting with them, they’ll absorb all the attention you want to focus on what you’re trying to communicate.
6. Practice, practice, practice.

Practice might sound ridiculous if it’s something the presenter does every day, but doing a task, or even training someone in person or over the phone, is different from explaining it on camera.
The vocal delivery of how-to videos runs the gamut: One extreme consists of small words, short sentences, and painfully slow speech, as though the presenter is addressing dimwitted puppies. The other is a detailed, mumbled, rapid-fire explanation of every-case scenarios, bristling with jargon, that only the most dedicated expert will understand. You should aim for something smack in the middle: a relaxed, conversational pace, using language and assuming a skill level appropriate for your customers. Never talk down to customers. After all, they are smart enough to buy your product.
Run through it a couple of times with the whole team, including the person who will be handling the camera and sound recorder. That’s when you’ll catch a distracting background noise from the environment, or an awkward movement that hides what the demonstrator is doing while planting an elbow in front of the lens.
7. Dust and vacuum.

I mean this literally, not figuratively. Most how-to videos are done at the place of business, like a cleared-out conference room, someone’s desk, or a corner of the factory floor. You’d be amazed at how many videos are marred by an environment that needs a good scrub, or at least a cursory spot-cleaning to get rid of the distracting coffee stain on the carpet and an unsightly smudge on the wall paint. Dirt is distracting, and it gives the impression that your organization is either not aware of the details or doesn’t care about them.
8. Light, shoot, and record sound properly.

One school of thought says that in an age where children get thousands of views and teenagers do product reviews in their bedrooms, it doesn’t matter what your business videos look like. Here’s an important fact: nobody ever graduates from this school of thought. They’re held back for year after year while their competitors pass them by. You don’t have to be Walter Pfister (cinematographer for The Dark Knight and Inception) or Thelma Schoonmaker (edited everything Martin Scorsese ever directed). But paying attention before you turn on your camera, even if it’s a phone, will make a difference.
- Lighting doesn’t have to be fancy, but it should be even, flattering to the presenter, and free from harsh shadows and hot spots. (How many videos accidentally obscure the very button you’re supposed to push with a shadow or a glare? Lots.) The fluorescent lighting still common to many workplaces is no one’s favorite option, but these days it can often be overcome by changing your camera’s white balance setting, or mitigated in editing. If you’re shooting something portable, see if you can relocate your scene to somewhere with a window to provide side light, or even out of doors in indirect sunlight.Of course you want to make sure that the process you’re capturing is well-lit, but in any environment, a little bit of extra lighting — called fill light — can lighten shadows and help add depth.One of easiest and most effective ways to create more depth is to place an extra light source behind the thing that you’re shooting, to create a visual separation between your scene and the background. Let’s say you are making a video of a piece of equipment that’s sitting on a neutrally-colored metal cabinet, and the cabinet itself is set against a wall. If you pull the setup a few feet away from the wall, put a light on the floor behind it, and aim the light up at the wall, your scene is suddenly a lot more interesting and has a lot more depth, Similarly, you can take small light sources — even an ordinary desk lamp will do in a pinch — and illuminate deep shadows in corners. Once you do that, it becomes easier to discern the shape of the subjects you’re shooting.
Our favorite tools for fill light are small, battery-powered LED video lights. Most of them allow you to adjust both intensity and color temperature to match existing ambient lighting. They’re not expensive, run cool, and are very portable. And while they don’t have the longest battery life in the world, to us, that’s a worthy trade-off for not having to lug extension cords and find unused outlets in your location. Some come in kits with small or large tripod mounts, but in a pinch, you can prop them on a chair or just have a willing volunteer hold them.
- Unless you have a good communications reason to do otherwise, put your camera on a a tripod. Clarity is the aim here, not jumpy zooms or creative angles. If you must move the camera (for example, to follow an action or process), use some kind of stabilizer. Some cameras and lenses include very good stabilization systems that will do a good job of countering mild movement. For more robust movement, use a shoulder harness or gimbal.
- If you do use a gimbal, allow lots (and lots) of time to set them up, calibrate them with your camera, and practice using them. Gimbals can range from small and simple ones for cell phones, to professional systems designed for cameras of all sizes. But even the small ones are heavy and tiring to use once you’ve added a camera and lens, require re-balancing every time you change the lens, and can be expensive. If you’re thinking of going this route, rent one first to see if it’s a good solution for you.
- If you don’t have time to learn to use the stabilizer, USE A TRIPOD.
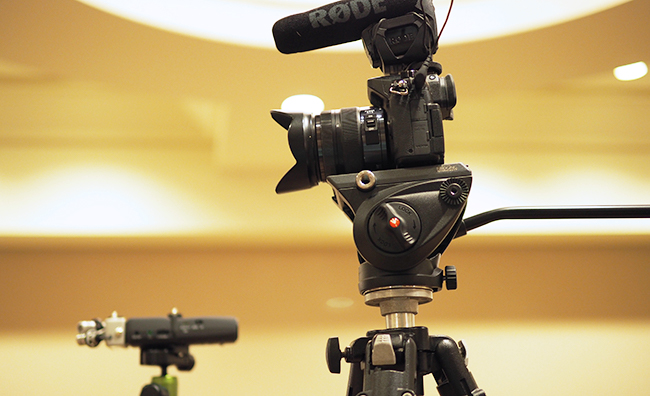
- If you can, get at least two angles: a master/wide shot of the whole step or process, and a closeup of whatever you’re doing. If someone will be talking on camera for more than a few seconds at a time, get both a head-on and side shot so you can break up long speeches with visual interest. We usually bring two cameras and get both of these at the same time. (The photo above was taken when we were taping a client presentation at a conference. What you’re seeing is the “A” camera, with an attached microphone. I took this picture with the “B” camera. The room had some sound challenges, so the object in the back of the photo is a backup sound recorder.)
- If the main focus of the video is a talking head, don’t have them sit or stand in the very middle of the frame for more than a few seconds. A bit to the left is more dynamic, more interesting, and leaves room to add graphics later.
- When you look in the viewfinder, look in the corners. This is the first lesson that photography students learn, for good reason. When we’re focused on a subject, our brains shut out meaningless distractions, like overflowing trash cans, hanging wires, clutter, or an onlooker’s foot at the edge of a frame. On the captured image, though, these distractions are obvious, embarrassing, and the fodder for amusing Internet memes.
- If there’s too much ambient noise, or your sound recording test quality is poor, consider recording without sound and adding it later as a voiceover. If you do this, however, don’t have the presenter talk on camera. Matching it up later would be a nightmare.
- If the presenter will be moving, use a wearable mic, like a wireless lavalier. Otherwise you’ll have problems like this.
9. Edit.

Start at the beginning, finish at the end, and cut out extra bits in the middle, particularly vocal flubs, do-overs, and fumbling with products, controls, or tools. Some angles might be better than others, and some shots work better in a different order. If you have the skill to do so, move these around as needed.
Often, you don’t need much editing. A client of ours was recently given a video recording of a talk she gave at a conference. It was an excellent demonstration of her knowledge, but it started too early, with a generic introduction and questions from the moderator about whether she’d need a laser pointer. It ended too late, with a lingering shot of our client leaving the podium and the moderator stepping in to introduce the next item on the agenda. It was a simple matter to trim the video so that it captured attention from beginning to end.While we were at it, we were able to add opening and closing graphics and sound cues, and optimize the video for better SEO.
Whether you decide to create your how-to or explainer videos in-house, or get some outside help, understanding the fundamentals of how to go about it will make the process easier and the result more effective. Questions? Leave them in the comments, or contact us.
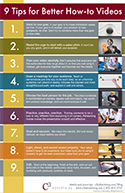 For a handy shortcut reminder of these tips, download the PDF infographic. Just fill out the form and…I’m kidding. There’s no form. Just download the PDF and enjoy.
Thanks to C3’s Video Writer/Director/Producer, Heather Hillstrom, for contributing to this post.